31 July 2013

Little Guestroom - 1 Year Update


Oh the little bedroom. In our vernacular, this room and the craft room are joined. The story of the craft room and the little bedroom are the same. We started here in our journey for the year. Let's look back shall we? 


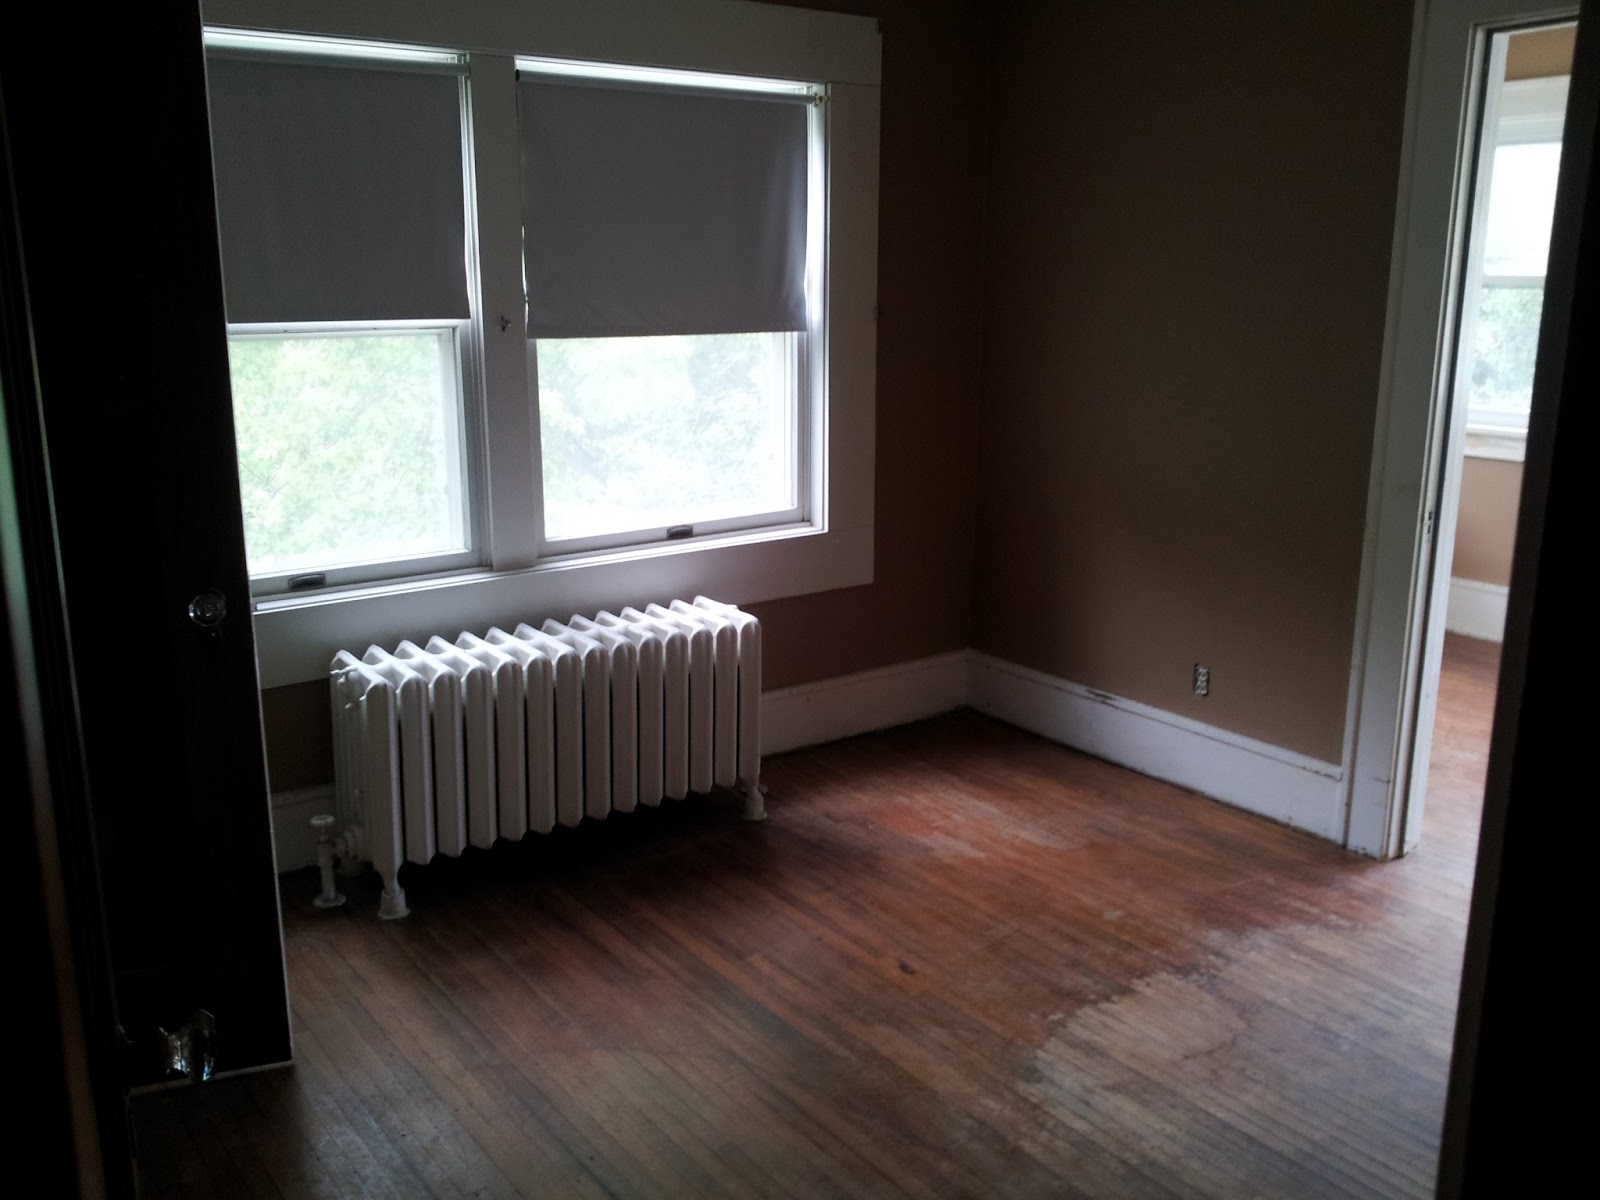
This room was puzzling to us from the beginning. It's really small for a bedroom. For a while we though the bedroom and craft room must be the same bedroom. Then, we thought we'd knock down the wall the joins it and make it an awesome master suite. Then we realized, this was probably meant as as a nursery. And, since we like each other, we may, someday, maybe, possibly, definitely, are considering, eventually, hypothetically, have a chance of having kids. And kids generally require a room to start in, like a nursery. Oh baby! But, until the joyous terrifying day, it will serve as a guest room.


The floors in here were rough. It looks like at one point they had roof issues and it leaked onto the floor and created some damage. No worries, they installed a new roof, but the damage remains. Even after Zach worked sooo hard to restore the floors, there is still a black spot, can you see it? We could replace the planks, but for us, it's okay. It's still sturdy and hey, it looks 100x better than it did.

Check out those blinds and curtains. I installed all the blinds myself. They're cheap Walmart ones, but they do the trick. These are slightly small for the window, so if you come to visit, use them with care. I also whipped out those curtains. They're made from $1/yd navy blue fabric from, you guessed it, Walmart, about $9 for the two panels with extra fabric to spare. They're currently unlined, but I could always add it later. If you'd like to know more about the bed, you can look at my burlap boxspring posts here and here.


The room is still pretty sparse. It has the same grey walls as the craft room. The lamp on the left was bought for about $1 at an auction. We spray painted it blue with the same color from the frames in the craft room. I'm still trying to decide how to refinish the shade. We'll eventually get a dresser for in here, but I haven't found the right one. I'd like to find one like the entertainment stand, long and low, that could someday, maybe, potentially, possibly double as a changing table. 

What do we have left to do?
  • New light fixture, possibly a fan
  • Paint/Repair the ceiling
  • Build a radiator cover
  • Install the floating shelf for a night stand
  • Find/Refinish a dresser
  • Buy a cute rug
  • Hang things on the walls
Now, for some satisfying side-by-sides:


30 July 2013

Burlap Bed


About a thousand years two months ago I did a post on putting burlap on a boxspring. I thought you might like to see the finished product. On a side note, Google keeps correcting my spelling of boxspring. I've made an executive decision that is a compound word and no hyphen is necessary. Little, red, squiggly line is to be ignored from here on out.
The bedspread is orange and tan and is from Target. The curtains are actually navy blue and made by me with Walmart fabric. On the radiator is a floating shelf we want to put in the corner for a nightstand. Good idea, right? This bed got lovingly place in the little guest bedroom. I still need a comforter for in here. I want a navy blue one, but all the navy blue ones I find are reversible with light blue. That just doesn't work for me, I'll hold out for the right one.

Zach cut down dowels and screwed them into the boxspring to give the bed some height. We used 8 total, 3 on each side and two in the middle. We simply poly-ed them and left them looking natural. This was a lot cheaper and actually more stylish than the legs you could buy at the store. I know, dowels have no style, but you should've seen the pre-made legs. We had to buy special double-headed screws from a hardware store to make it all work. If you plan to copy, be prepared for strange looks from the employees while you describe what you want and why. 

The best part of this bed was carrying it outside from the garage to inside the house at 3am while our neighbors sat outside and questioned our sanity. You see, our first house guests since finishing all of this were set to arrive at 9. We like to do things last minute. Back to the bed, we've had two guests stay in the bed so far and neither has complained. The bed is sturdy and comfy. Success!

29 July 2013

Upcycled Branches


My fun little craft is finished. I love something I can finish in less than 24 hours - oh instant gratification. Yesterday, I posted about our tree that fell, and today I'll finish the craft. I chose the thickest fallen branches from the tree. It wasn't very old, so they weren't huge.


Zach taught me how to use the miter saw. I've invaded his workshop. I didn't make exact measurements to the "chips" I cut, I wanted them to be rustically random. 

Excuse the anatomy images, this was the best/cleanest flat surface down there...
Next, I picked a few words I wanted to use and sketched out each letter on the chip. You could probably print off letters and write them in, but I was okay with some simple lower-case lettering.


A few weeks ago we picked up a wood burner, about $10 from Walmart. Zach wanted to use it on a different project, but I thought I could play with it here. If you don't have one or don't want to risk burning down your house, you could probably use a permenant marker. I really like the look of the burnt letters, but you can see for yourself.


These are definitely artist quality wood burnings, but if I could give any advice, I'd say to go slowly and retrace the lines until you like the thickness. I practiced with the burner on a scrap piece of wood, but the logs are different because they're still wet/alive. It basically meant that it took longer to burn and made a snap, crackle, pop as it went.

I found another scrap piece of wood, a 1x2. I used some leftover gunstock stain and gave it two coats. I love the red undertone in it.


I laid out my letters along the board to check spacing and alignment. Probably should've done this before staining.


 I used this Gorilla Wood Glue, it's like super glue, but for wood. It's so simple and dries quickly. I placed a generous amount on the bottom of each chip, attached it to the plank, and "clamped" it with some painters tape.


As you can see, I staggered mine, I thought it made it look more interesting and random. The glue says it takes 20-30 minutes to dry, but a 24 hours to cure. I gave it 31 minutes, eagerly unwrapped them, and then found out they were still wet. Fast forward five hours and they were stable.


The final project! This is our wedding verse, so it has a lot of meaning to it. My dad was the officiant for our wedding and he used it throughout. We also have the reference engraved on Zach's ring. It's all about how on our own, Zach and I can be easily overwhelmed, but with God in the middle of our relationship we're unbreakable.
Sarah Norton Photography

"Though one may be overpowered,
two can defend themselves.
A cord of three strands is not quickly broken."


I didn't place them centered, and I love the way it turned out! It's a little hard to choose a spot to put this, because it's really long! Maybe if you do it you can pick a shorter book or phrase! Ha!


For now, it will live on our buffet in the dining room.


Craft Room - 1 Year Update


Chips, chips, and chips...

The room I was most nervous about when we bought the house was the craft room. You see, we got a USDA loan. It was awesome, but upon scouring message boards, I found some people had been denied based on chipping paint. This room had lots of chipped paint and I just knew the assessor would deny our loan because of it. Obviously, it didn't. Get a load of the befores.


For the first six months we had the house, the craft room was lovingly called the "Room of Requirement". We stored everything in here and it was wonderfully out of the way.

This room is very out-of-the-way. We decided to start here for just that reason. We figured if we take as long as we wanted here, and if we messed anything up, it wouldn't be in the public view. You can see an earlier update we did that was mostly about this room here. This room, along with it's adjoining one, was Zach's first go at refinishing hardwood floors and our first go at painting trim.
The craftroom is behind him
I love to craft, seriously love it. Unfortunately, everywhere else we've lived, I've had to store away my crafts in random boxes and bags, which isn't conducive to crafting. When I saw the "sleeping porch", I immediately called dibs. Spoilers: Zach let me have it.

Okay, so enough reminiscing, here's the pictures.

Here's my sewing corner. If you sew, you know how blissful it is to be able to lay out fabric on a table, cut it, work on it, and leave it there. I can do that here... love. See those pictures? They're still the only things hung on the walls. They're cheap Walmart frames painted with navy blue spray paint. Then I had black & whites printed of my nieces and hubby. I love the grey color on the walls, too. It just ties it together.

Check out those curtains. I fell all over the chevron trend. I Etsy-ed my little heart out and found curtains like these. They're beautiful, but I can't afford $119 for two panels. So, I DIY-ed 'em. I'm sure the Etsy ones are beautifully lined and the hems are straight unlike mine, but since it was for my craft room, I just went for some cheap Walmart fabric. I made all six mid-length panels for about $35 and a few hours. We hung them up with Dollar General curtain rods ($1ea). I'm pleased.

Basically the same shot, but this time look at the table skirt. See my giant roll of burlap back there? Yep, I made it from that. I made four different sections with pleats. Then I stitched on some Velcro, glued the opposite sides down to the table and attached it to the table. It's great at hiding my storage drawers. My current project is sitting on my table - flower pens for my desk at school.

When Zach was finishing this room, he surprised me by putting in a chalkboard wall. Did I mention I love him? He's amazing. So in this corner I have some more storage space (not currently organized or utilized). Right now I have one of my favorite verses on the chalkboard wall, James 4:7-10

"So let God work his will in you. Yell a loud no to the Devil and watch him scamper. Say a quiet yes to God and he’ll be there in no time. Quit dabbling in sin. Purify your inner life. Quit playing the field. Hit bottom, and cry your eyes out. The fun and games are over. Get serious, really serious. Get down on your knees before the Master; it’s the only way you’ll get on your feet."


Seriously, look at those floors. Zach is amazing - he did every single plank of them through the whole house, by himself. I'm a blessed lady! Also, the chair. How cool is that? It's a vintage office chair (maybe from a courthouse?) that my mom gifted me for my birthday. I sewed a chair cushion to match the navy blue and orange theme, and attached it with ribbon. 

There you have it! My craft room is a wonderful woman-cave. It's great to lay out all my "stuff" and leave it. I'm so thankful that Zach let me have this space as my own. Now, what do we have left to do?
  • New light fixture
  • Fix a few windows
  • Paint/Repair the ceiling
  • Install door weatherstripping
A few side-by-sides:


So... what do you think?

28 July 2013

Time Flies

I can't believe it. We moved in one year and ten days ago. I hoped to have this done on the 18th, but you know, life happens. I also kept putting it off, thinking I'd wait until I got this hung up, or put that together - but then it wouldn't really be a one year update! We definitely aren't done, not everything is where we want it to be, but we want to share where we've come in a year!


This year has been amazing. We've worked really hard, gotten a dog, spent a bunch of money, spent lots of time together, and learned more about repairing things than we'd ever imagined. We had no idea all of this would go into 1 year in our first house. It will be a fun challenge to recap it all in the next posts.


Over the next week, I'll be showing off, room by room, of what's changed in one year. Some rooms have a lot, and some have basically nothing. I hope you'll follow along to see how our 1919, Craftsman Foursquare is becoming home.

Timber!

We had a freak wind/rain storm that lasted all of about five minutes on Thursday. Unfortunately we lost a tree during the few seconds it was blowing.

It stinks because it was a healthy tree that provided some great shade and privacy to our house. Today I went out and made the tree look this this:


Bam.
Seriously, I chopped it all by myself. The whole time I kept hearing my mom sing "I am woman, hear me roar" in my head. Did I mention I did it all with a handsaw? All muscle power, lady-style.


Well, I couldn't let Zach take it all to the recycling center  as yard waste (he's helpful), it just seemed... wasteful. So I decided to google crafts about using logs. I found the following:

created at: 08/28/2011

All of these are awesome, but they would 1) take a while or 2) required supplies I don't have. So, I made a quick mental inventory and whipped up a craft. Because let's be honest - I'm impatient and when I wanna craft, I wanna craft now. I'm about half way done with it now, but I'll give you a sneak peak!

Love the macro setting on my phone

I know I haven't been blogging - I suck. We've been busy and gotten tons done, so I just need to update it for you all. Also, our computer is awful. It overheats and shuts off randomly, so if you'd like to give me a new one... For my final excuse, I'd like to use this photographic evidence.
You see? It's her fault. She won't let me type. And for one more adorable Cedar picture to close out the post.


Big booty