
We are pretty excited about it at our house. It's one of our first statement pieces to break up all the simple tan and brown furniture staples. My husband even likes the finished color - which is something I was worried about, I thought it might be too girly!
If you missed the beginning posts, click the links to read about the original and the first steps of the transformation. Beware, this posting is pretty picture heavy.
After one coat of primer and three - count 'em three - coats of paint I waited over night for it dry. This was hard for me... I'm impatient! The next day we did a Menards run and picked up some new knobs.


They were a steal! I had a hard time imagining spending 3-5 dollars per pull on a dresser that was free, especially when I needed 12 pulls! Did I mention I'm cheap? The hubs and I both decided we wanted something darker but with some interest, and these copper and black pulls were perfect. They were .68 cents a piece but there was a 15% off sale. Score!
 |
| See? Not kidding. |
 |
| It's important to look intense while using the drill. |
 Once we got home we measured out the drawers and marked the center. I watched this handy YouTube video. I extended the lines to make a big "X" in the middle and then measured 1 3/4 inch from each side of the center because our pulls were 3 1/2 inches. If you remember, I used the wood putty to fill the original handles on the side drawers, but left the center knob holes intact. So based on my marks the hubs drilled out the new holes and screwed in the handles.
Next, we needed to cut out some squares in the back of the empty drawers to thread the wires in. I sketched out the size of the box on the inside back. I wanted it to be big enough for a three prong plug, but not big enough that you'd see it while watching TV. I drew it on the inside so I could be sure my spacing was correct.
 |
| If you squint you can see it. |
Next, we drilled a hole into each corner to have an outline to cut from on the back. We used a small bit because I didn't want to splinter or split the plywood, but later we used a bigger one and it was fine.

Next we tried to jigsaw out the squares. This proved to be more difficult than it should have been because our jigsaw apparently has only the murderous-violently-shaking speed. So, in actuality we used a mini hacksaw and the jigsaw in combination.


After the holes were cut out, we sanded them down, vacuumed out the debris, and touched up the paint. In retrospect we should've cut the holes before painting - oh well, live and learn.
 |
| Finished hole |
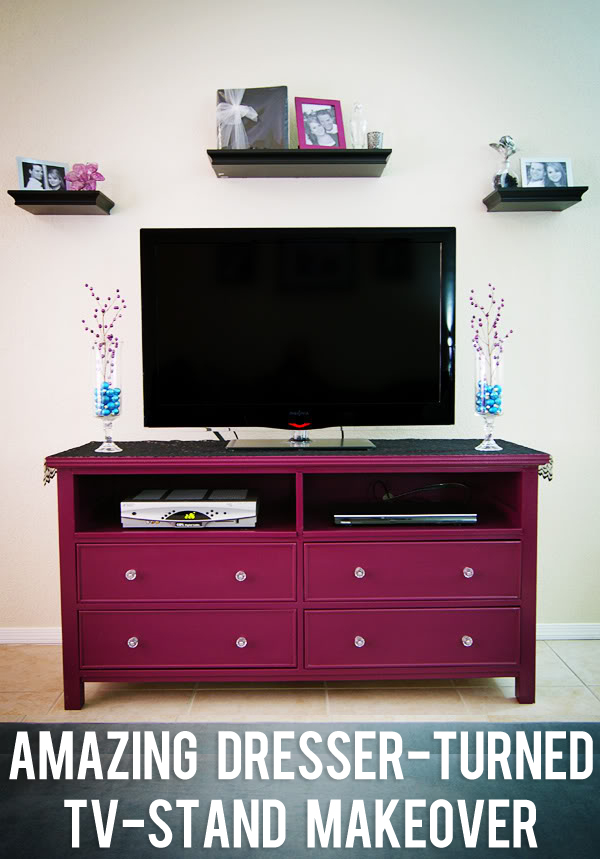
Finally, we untangled all the TV wires - why are there so many?! - and set it up. Lets take another look at the finished project shall we?

I love the curved pieces on the dresser. It adds some sophistication and fun. I think the pulls pop and give the cheery color some depth. Ignore the fact that the TV is in front of a window. It will only live here until the den is done (note the unfinished floors and phone wire popping out of the floor...) - maybe another week? I'll post an updated picture when we get it moved into place.
Oh and let's not forget the final cost of this "free" dresser:
- 1 Gallon of Primer - $15 (still have 3/4 left)
- 1 Gallon of Paint - $22 (still have 3/4 left)
- 4in Trim Roller - $5
- Roller Pads - $4
- Paint Brush - $3
- Knobs & Pulls - $8
Total Cost: $57
Not bad for a custom, substantial piece of furniture!
I've seen some cute ideas of how to accessorize it like these:
 |
| From How Does She |
 |
| From Project Palermo |
 |
| From Two Twenty One |
 |
| From Craftify It |